

Migrate into your project
Use this when you want waypoint pathfinding inside a project you already have, instead of extending the standalone FAB template.
Migration overview
Section titled “Migration overview”flowchart LR FAB["FAB template project"] --> Migrate["Asset Actions → Migrate"] Migrate --> Target["Your project Content/"] Target --> Nav["Nav Mesh Bounds Volume"] Nav --> Component["Add BP_WaypointComponent to pawn"] Component --> Play["Find Path to Actor / Location"]
Example — minimal migrate into MyGame
Section titled “Example — minimal migrate into MyGame”Assume your project lives at C:/Projects/MyGame/.
- Open the Objective Waypoint System FAB project.
- In Content Browser, navigate to ObjectiveWaypointSystem/Blueprints.
- Right-click BP_WaypointComponent → Asset Actions → Migrate.
- Choose
C:/Projects/MyGame/Content/and confirm dependencies.
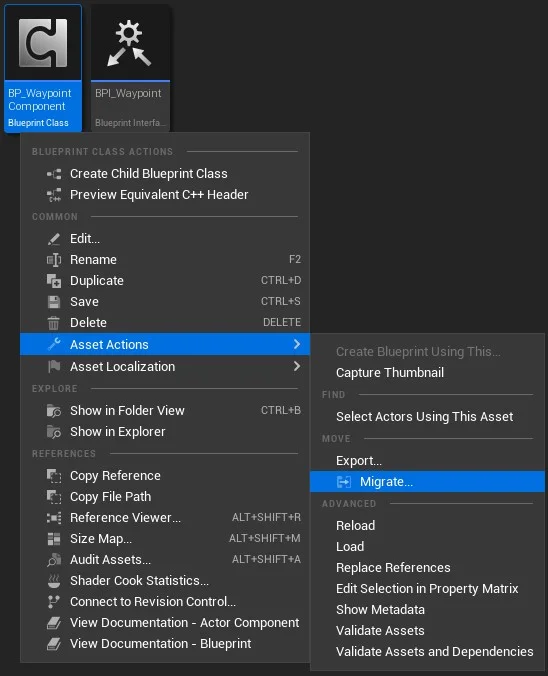
Minimum migrated assets
Section titled “Minimum migrated assets”The migrate dialog pulls dependencies automatically. Expect at least:
Content/ObjectiveWaypointSystem/├── Blueprints/│ ├── BP_WaypointComponent ← required│ ├── BP_WaypointActor ← Spawn mode markers│ ├── BPI_Waypoint ← SplineMesh mode interface│ └── Misc/ENavMode├── Meshes/SM_Waypoint_Arrow├── Materials/M_Waypoint└── Textures/ (if referenced)Optional demo content (migrate separately if needed):
├── Blueprints/BP_ObjectiveActor├── Blueprints/Misc/WBP_PlayerHUD├── Blueprints/Minimap/├── ThirdPersonBP/└── Map/OverviewAdd to your pawn
Section titled “Add to your pawn”- Open your player Character Blueprint.
- Add Component → BP_WaypointComponent.
- Verify Class Defaults (see Getting started).
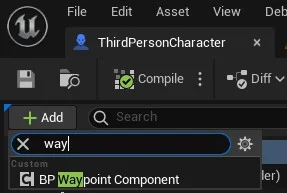
Navigation setup
Section titled “Navigation setup”Pathfinding requires a built nav mesh in your level:
| Step | Action |
|---|---|
| 1 | Place Nav Mesh Bounds Volume covering playable space |
| 2 | Press P in editor to visualize nav mesh (green) |
| 3 | Ensure objectives sit on or near navigable areas |
Without nav data, Find Path to Actor succeeds silently with no visuals.
First path call in your project
Section titled “First path call in your project”Minimal Blueprint (no demo HUD):
[Your input or quest event] → Get BP_WaypointComponent (from self) → Find Path to Actor (Target Actor, None)For world-position targets:
→ Find Path to Location (Vector, None)See Find path to an actor for a complete wiring example.
Integrate with your game (optional)
Section titled “Integrate with your game (optional)”| Approach | Steps |
|---|---|
| Component only | Migrate BP_WaypointComponent + deps; call from existing quest system |
| Copy demo character | Migrate ThirdPersonCharacter folder as reference; strip HUD later |
| Sub-level | Keep Map/Overview as a test sub-level while integrating |
| Spline mode | Implement BPI_Waypoint on your pawn (tutorial) |
Project settings checklist
Section titled “Project settings checklist”| Check | Notes |
|---|---|
| Navigation System enabled | Default in UE5 |
| Nav Agent matches pawn | Humanoid vs vehicle nav areas |
| Nav Filter Class | Set on component only if using custom nav areas |
No special collision channels are required (unlike some other YetiTech templates).
Troubleshooting
Section titled “Troubleshooting”| Issue | Fix |
|---|---|
| Migrate missing meshes | Re-run migrate from BP_WaypointComponent and accept all dependencies |
| No path visuals | Rebuild nav mesh; check Enable Waypoint |
| Path incomplete | Target off-mesh — add Nav Modifier Volume or move objective |
| Too many actors | Lower cap with Max Number Of Meshes; increase Mesh Distance |
| Spline mode empty | Implement BPI_Waypoint on pawn; pass Spline Component |
Video reference
Section titled “Video reference”Full integration walkthrough: Video tutorial.
- Getting started
- Blueprint reference
- Try the demo (in FAB project before migrating)